Adventure Creation Quickstart Guide
Welcome to the Adventure creation quickstart guide! If you're hoping to get your feet wet learning how to create an Adventure, you've come to the right place. Following the 10 steps below, you'll have a simple Adventure up and running in no time!
While we aren't going to cover any particularly advanced mechanics in this guide, we'll cover more than enough to get you on your way making Adventures on par with the Quest for the Icy Soul roleplay event.
Step 6: The Stone Cell
Now it’s finally time to work on the mechanics of the Adventure! In this step, we’ll flesh out the whole first node. That’s four commands and three encounters, so it’ll be a little bit longer than the other sections of this guide. However, it should give you a solid feel for how Adventures work. Let’s get started!
6.1: the “look” command
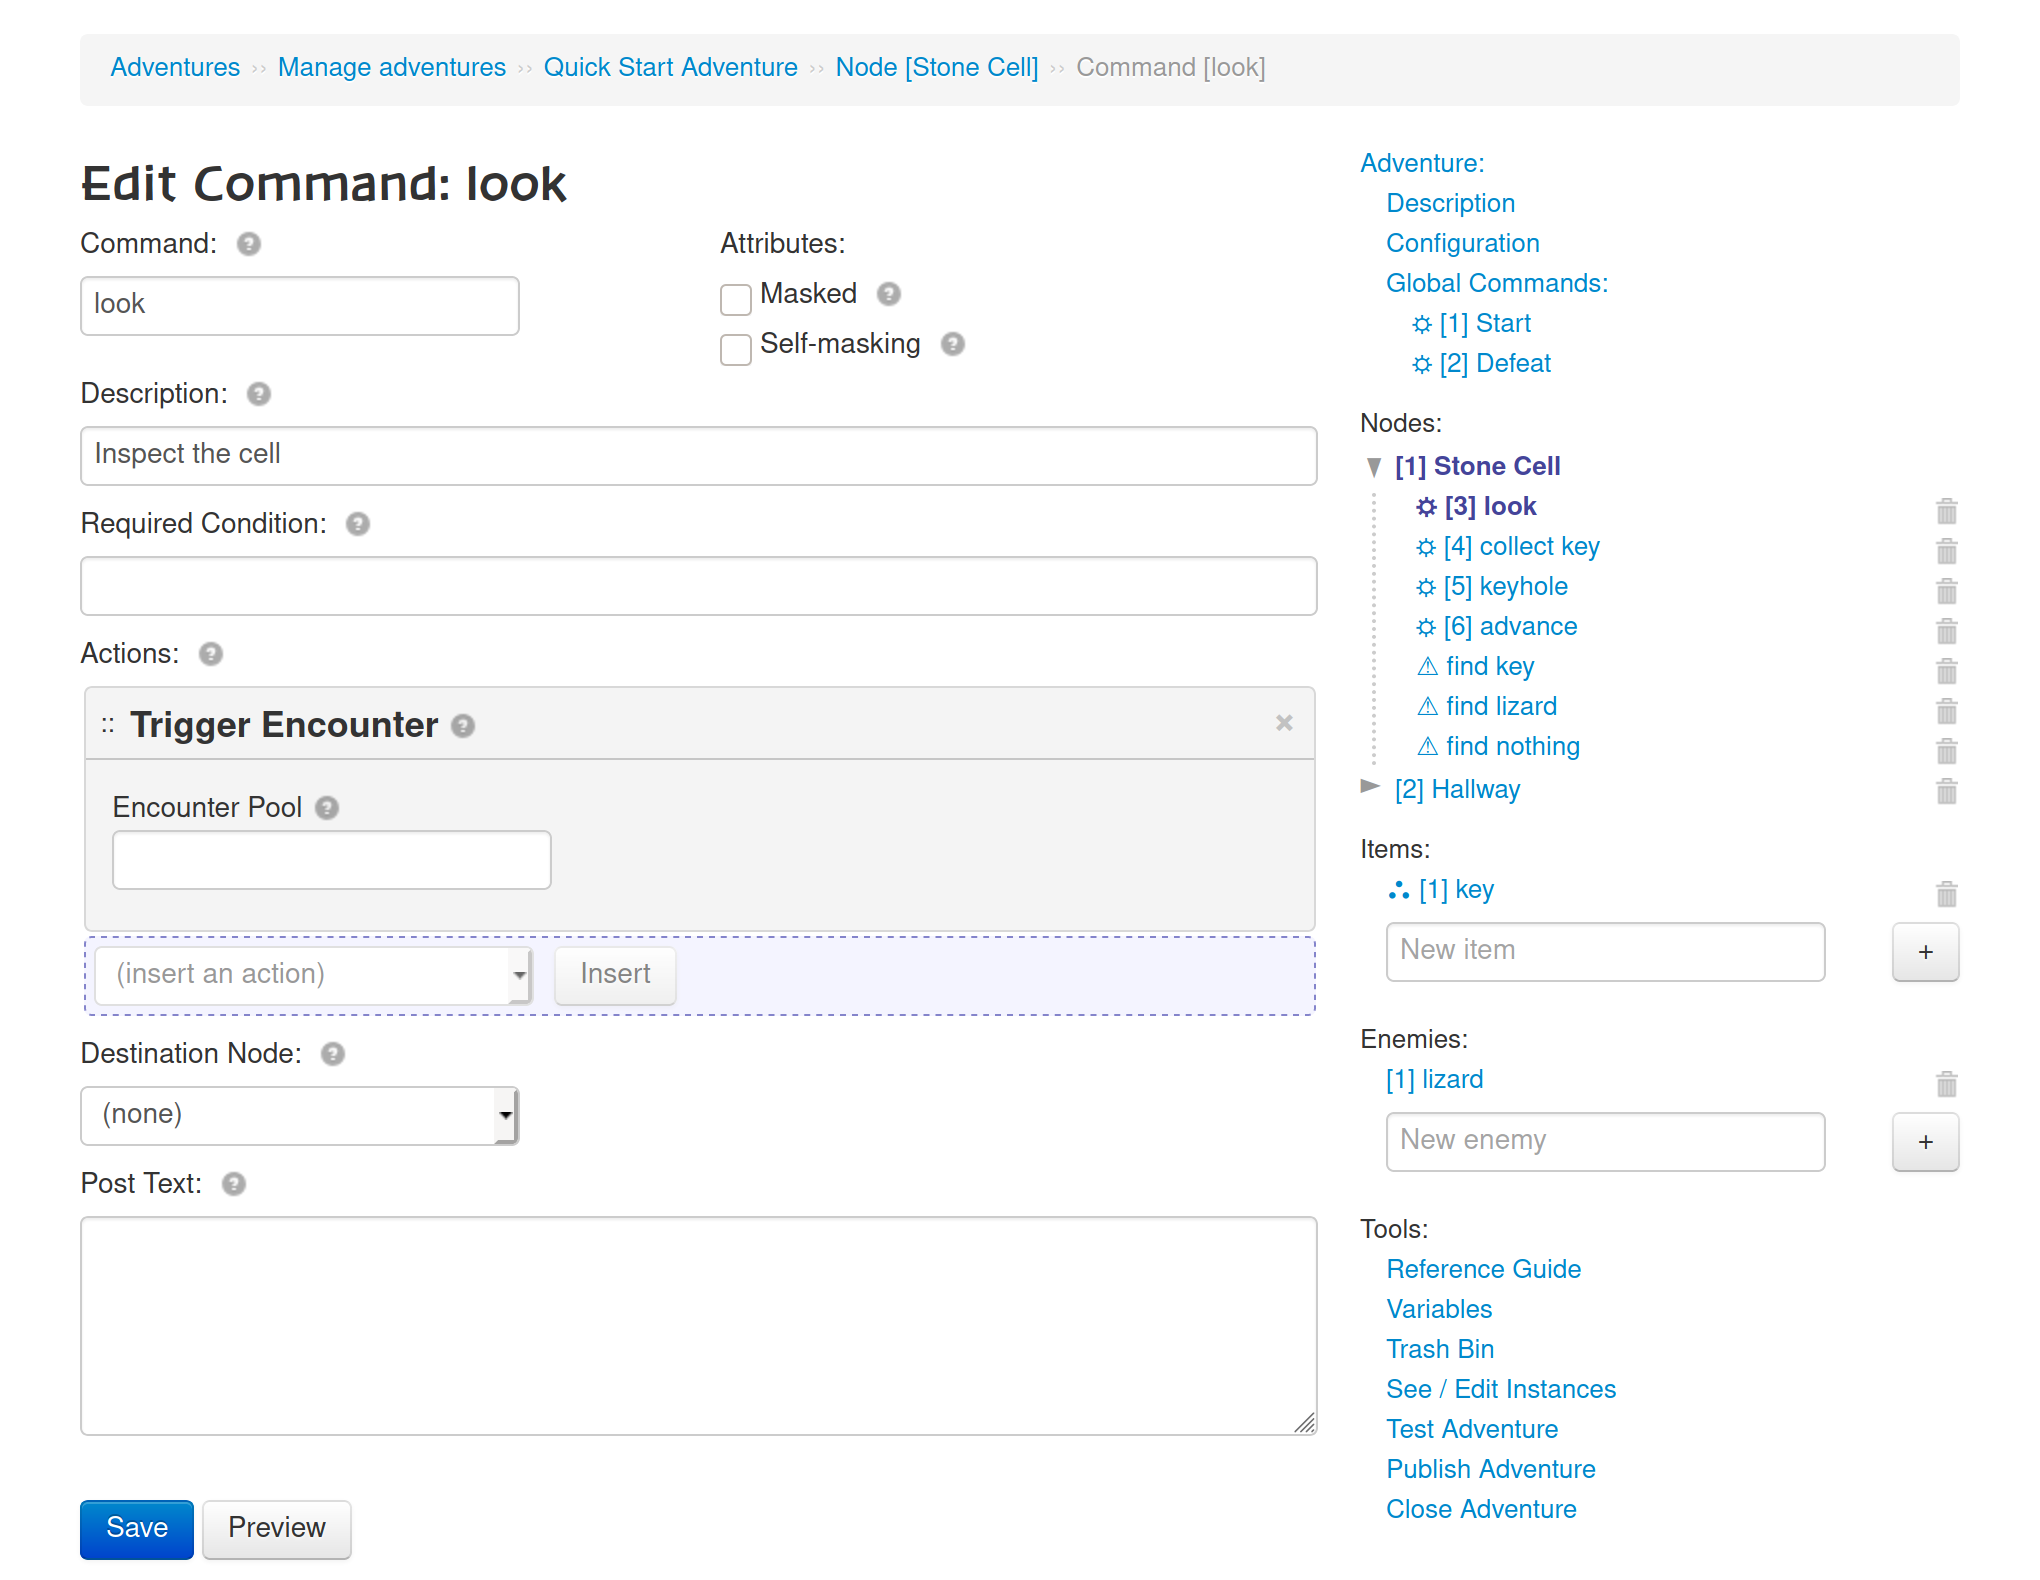
This command is responsible for conditionally finding the key, the lizard, or nothing at all. But the good news is that we offloaded the complexity of this random chance into the Encounters mechanic, so this command gets to be really simple! The only thing we have to do is to give it a description (the text shown to the Adventurer in the Command Drop-down) and make it trigger an encounter — the Adventure system will take care of the rest.
Instructions
- In the sidebar to the right, expand the “[1] Stone Cell” node by clicking on the caret to its left, then click on “⛭ [3] look”
- Paste the following under “Description”
Inspect the cell
- In the ‘(insert an action)’ drop-down, select
trigger encounterand click ‘Insert’ - Click ‘Save’
6.2: the “collect key” command
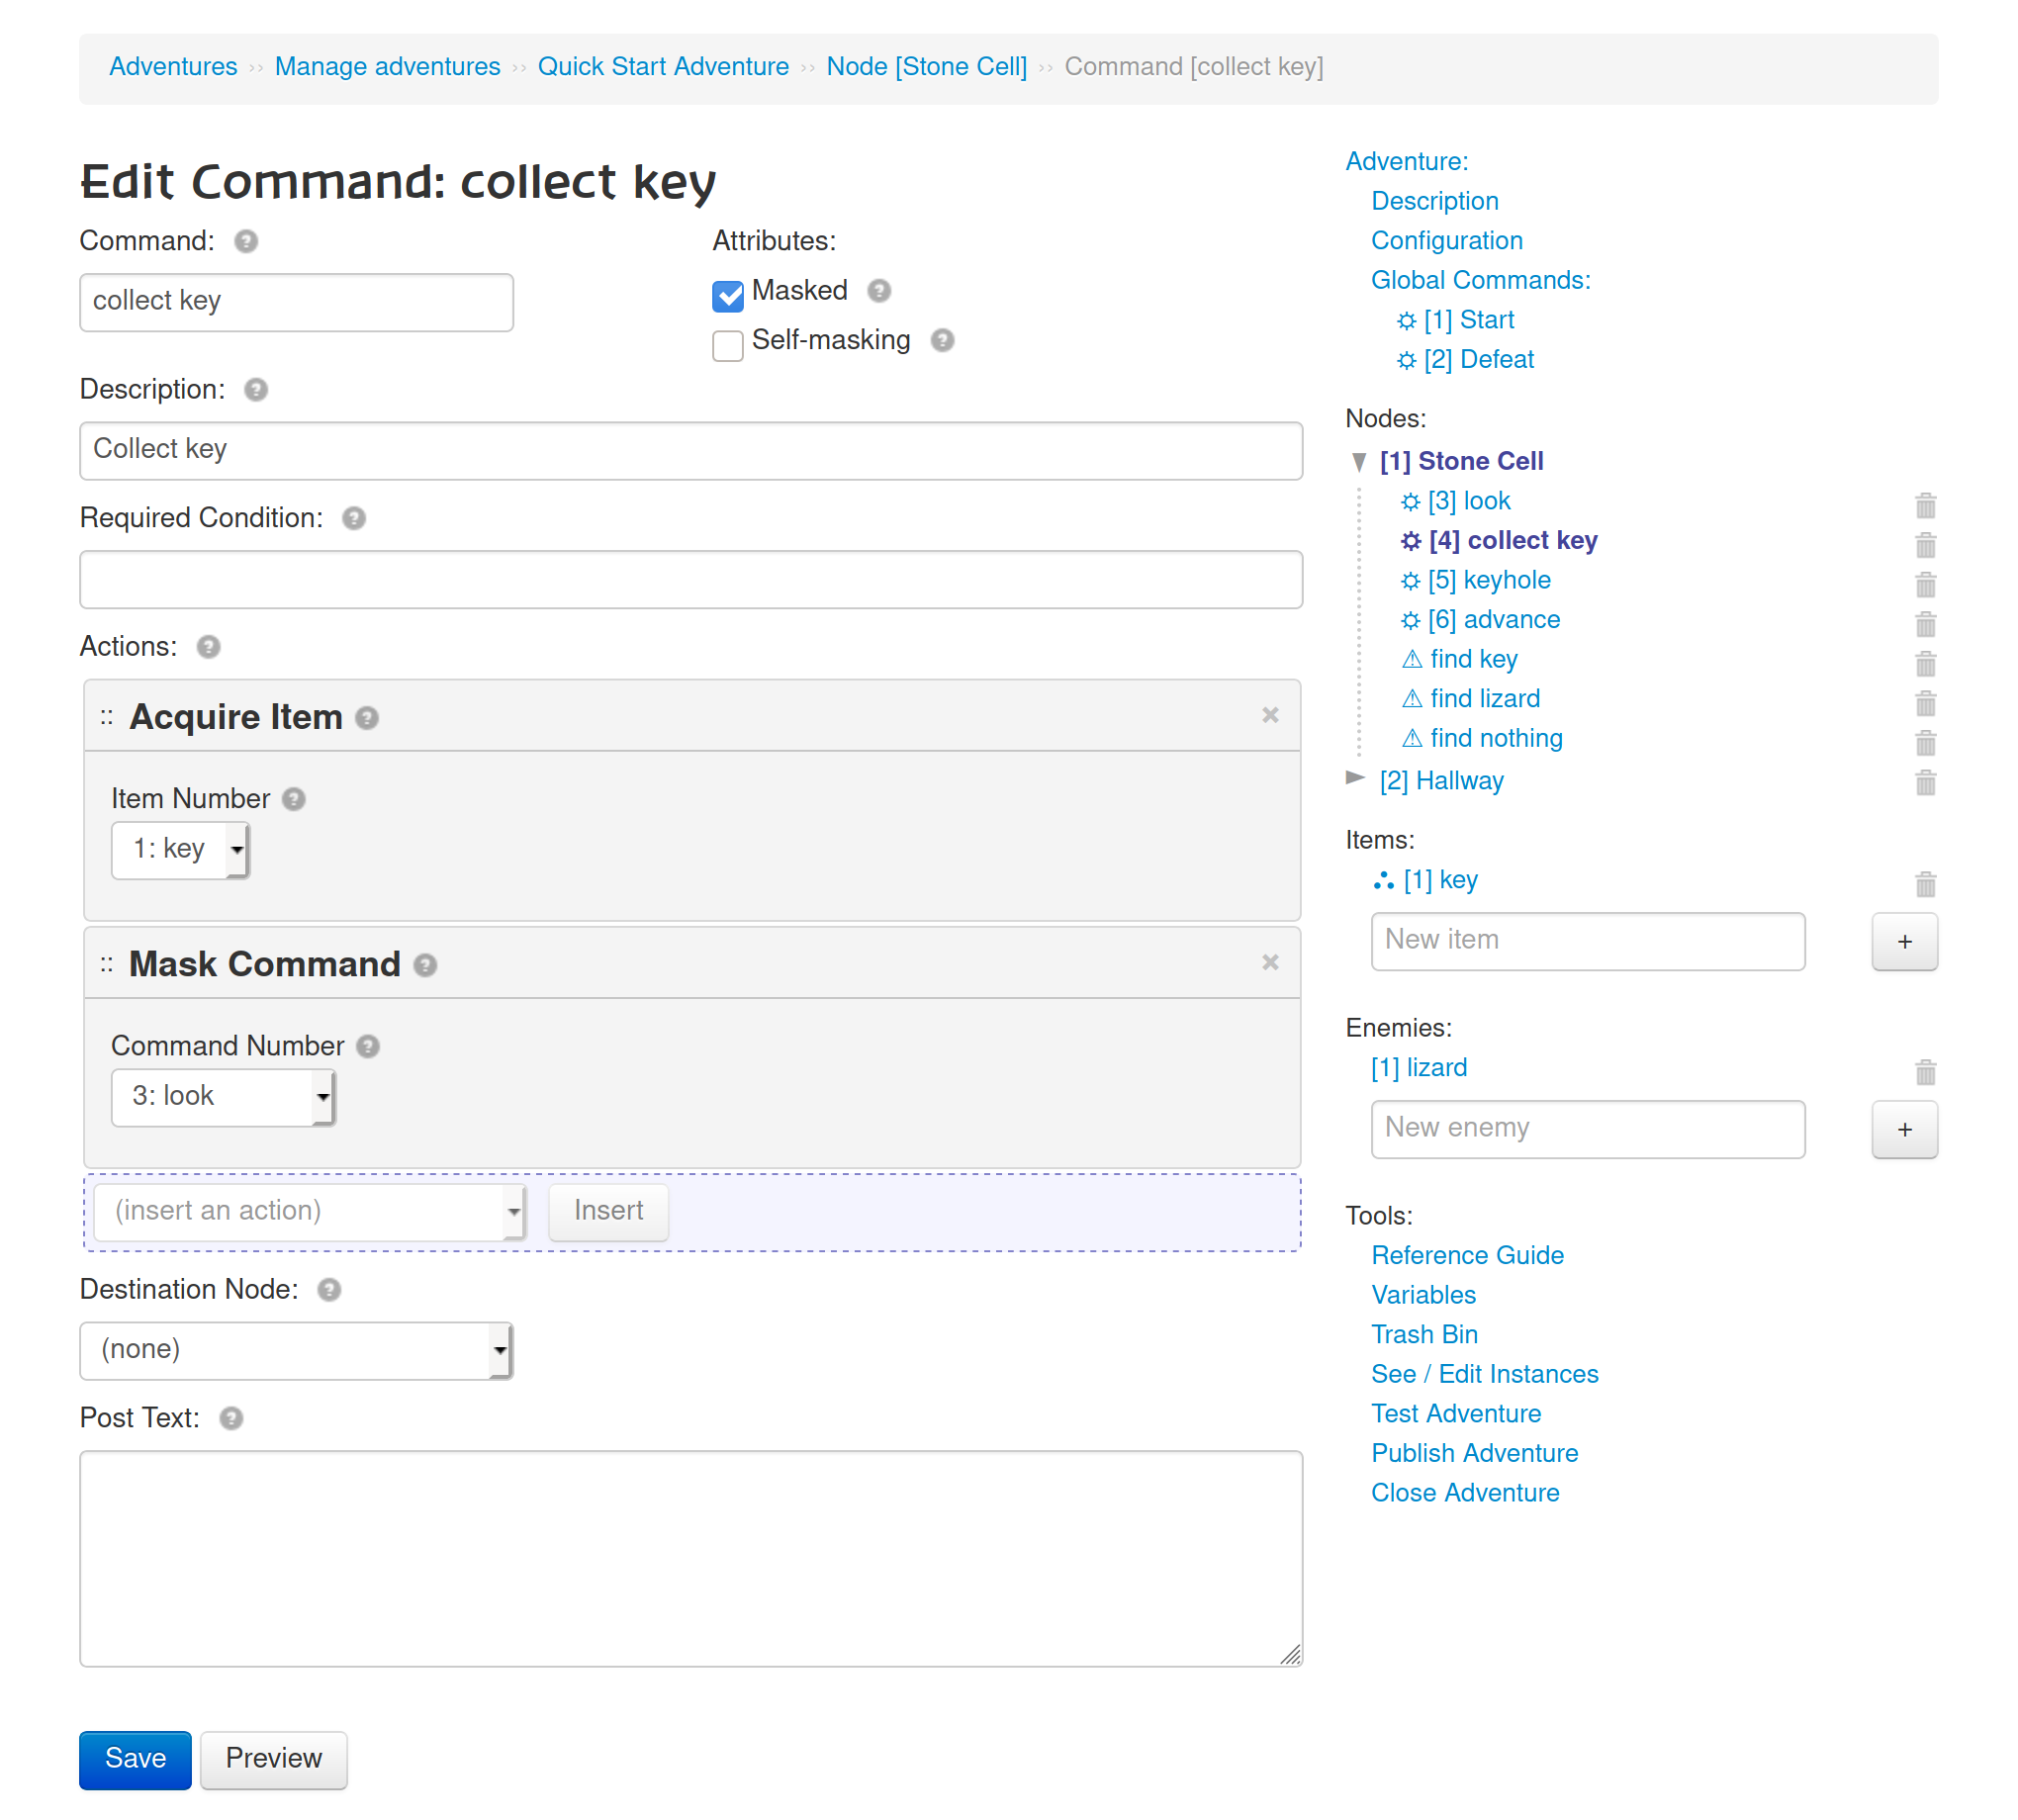
This command has two responsibilities: to give the key item to the Adventurer, and to make it so you can’t keep looking around the stone cell (because you’ve already found the key). This command is also special in that Adventurers do not run it directly.
Before going any further, let’s take a moment to talk about command “masking”. When a command is masked, it is not made available to Adventurers in the Command Drop-down. A command can be masked by default, and commands can also mask and unmask each other. We’ll use this ability both to prevent Adventurers from simply running this command directly, and to make it so that you can’t run the “look” command after running this one.
Instructions
- In the sidebar to the right, click on “⛭ [4] collect key”
- Under ‘Attributes’, check
Masked - In the ‘(insert an action)’ drop-down, select
acquire itemand click ‘Insert’ - In the resulting ‘Acquire Item’ action, ensure that ‘Item Number’ is set to
1: key - In the ‘(insert an action)’ drop-down, select
mask commandand click ‘Insert’ - In the resulting ‘Acquire Item’ action, set the ‘Command Number’ to
3: look - Click ‘Save’
6.3: the “keyhole” command
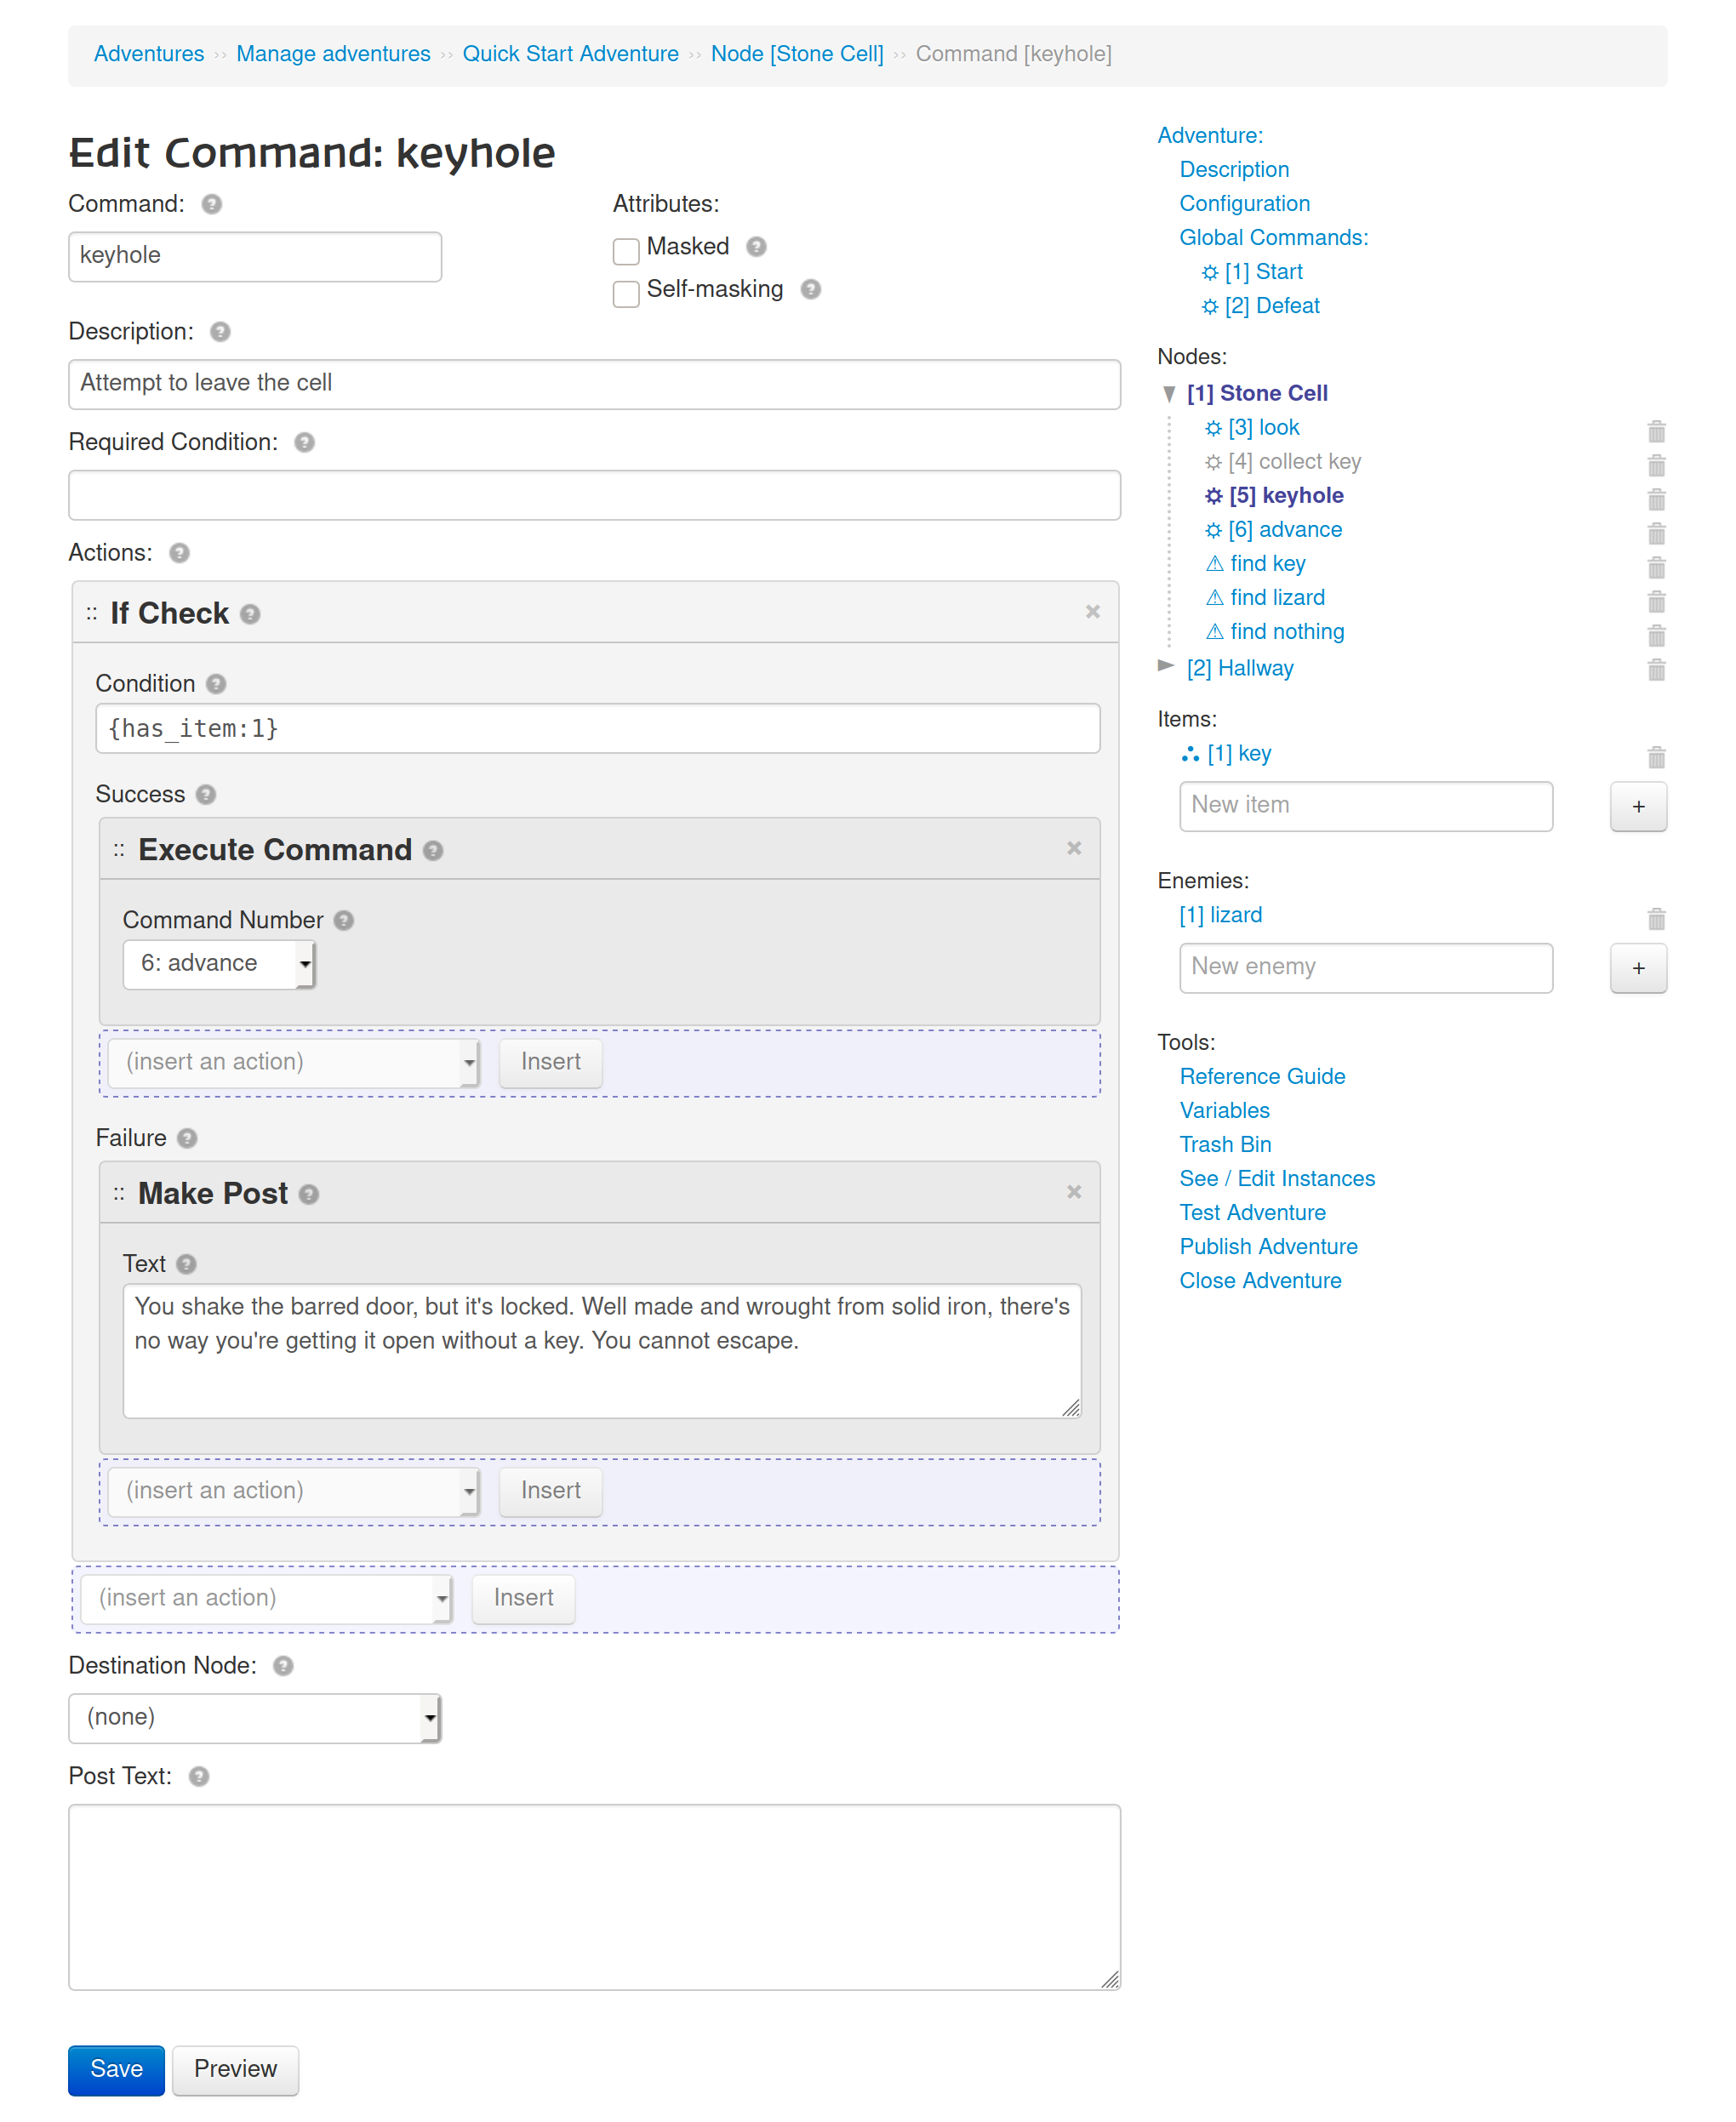
This command is an interesting one: it needs to behave differently depending on whether or not the Adventurer has the key item. We’ll also get a quick introduction to the concept of an Expression, which is one of the most powerful mechanics in the Adventure System. If the Adventurer has the key, then we want to advance the Adventure to the Hallway node.
One limitation of commands is that moving the Adventure to a different node cannot be done conditionally, but is instead done by selecting a node in the command’s “Destination Node” field. To accomplish this, we make a different command (“advance”) responsible for changing the node, and execute that command from this one. That may sound complicated, but it will become clear as you fill out the commands.
Instructions
- In the sidebar to the right, click on “⛭ [5] keyhole”
- Paste the following under “Description”:
Attempt to leave the cell
- In the ‘(insert an action)’ drop-down, select
if checkand click ‘Insert’ - In the resulting ‘If Check’ action, paste the following under “Condition”:
{has_item: 1} - In the ‘If Check’ action, under ‘Success’, insert an
execute commandaction - In the resulting ‘Execute Command’ action, set the ‘Command Number’ to
6: advance - Back in the ‘If Check’ action, under ‘Failure’, insert a
make postaction - In the resulting ‘Make Post’ action, paste the following under “Text”:
You shake the barred door, but it's locked. Well made and wrought from solid iron, there's no way you're getting it open without a key. You cannot escape.
- Click ‘Save’
6.4: the “advance” command
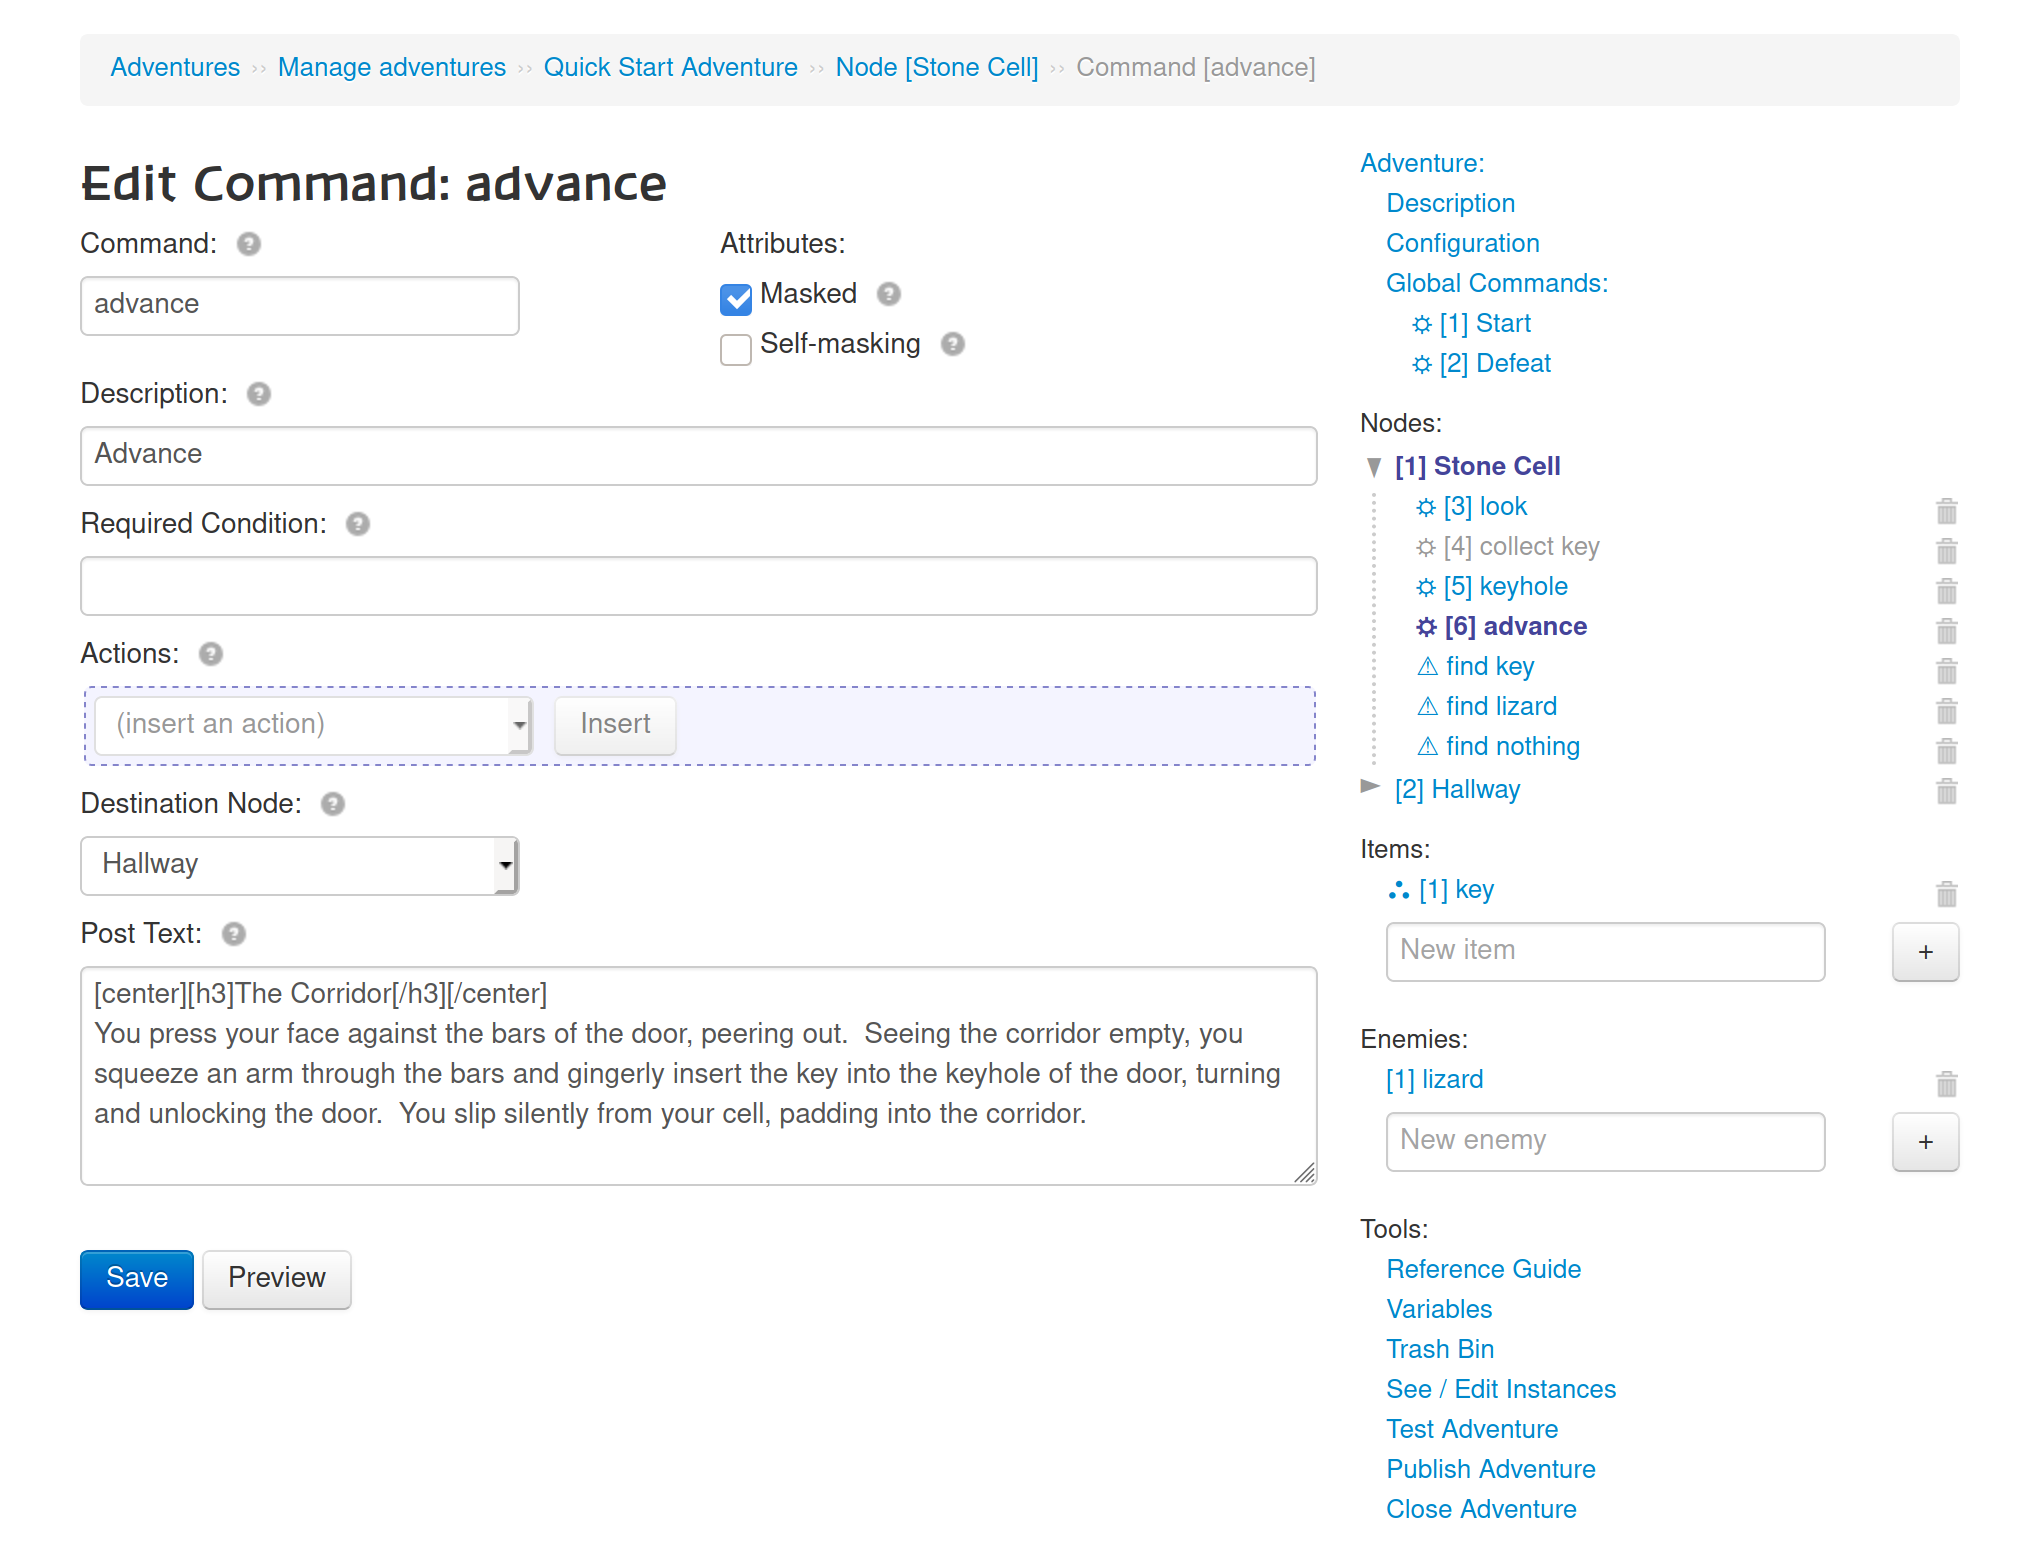
This command is another very simple one, and is very similar to the Start command we configured in Step 3: it makes a forum post and advances the node. We must also mask this command, because we don’t want Adventurers running it directly.
Instructions
- In the sidebar to the right, click on “⛭ [6] advance”
- Under ‘Attributes’, check
Masked - Set ‘Destination Node’ to
Hallway - Paste the following into ‘Post Text’:
[center][h3]The Corridor[/h3][/center]
You press your face against the bars of the door, peering out.  Seeing the corridor empty, you squeeze an arm through the bars and gingerly insert the key into the keyhole of the door, turning and unlocking the door.  You slip silently from your cell, padding into the corridor.
- Click ‘Save’
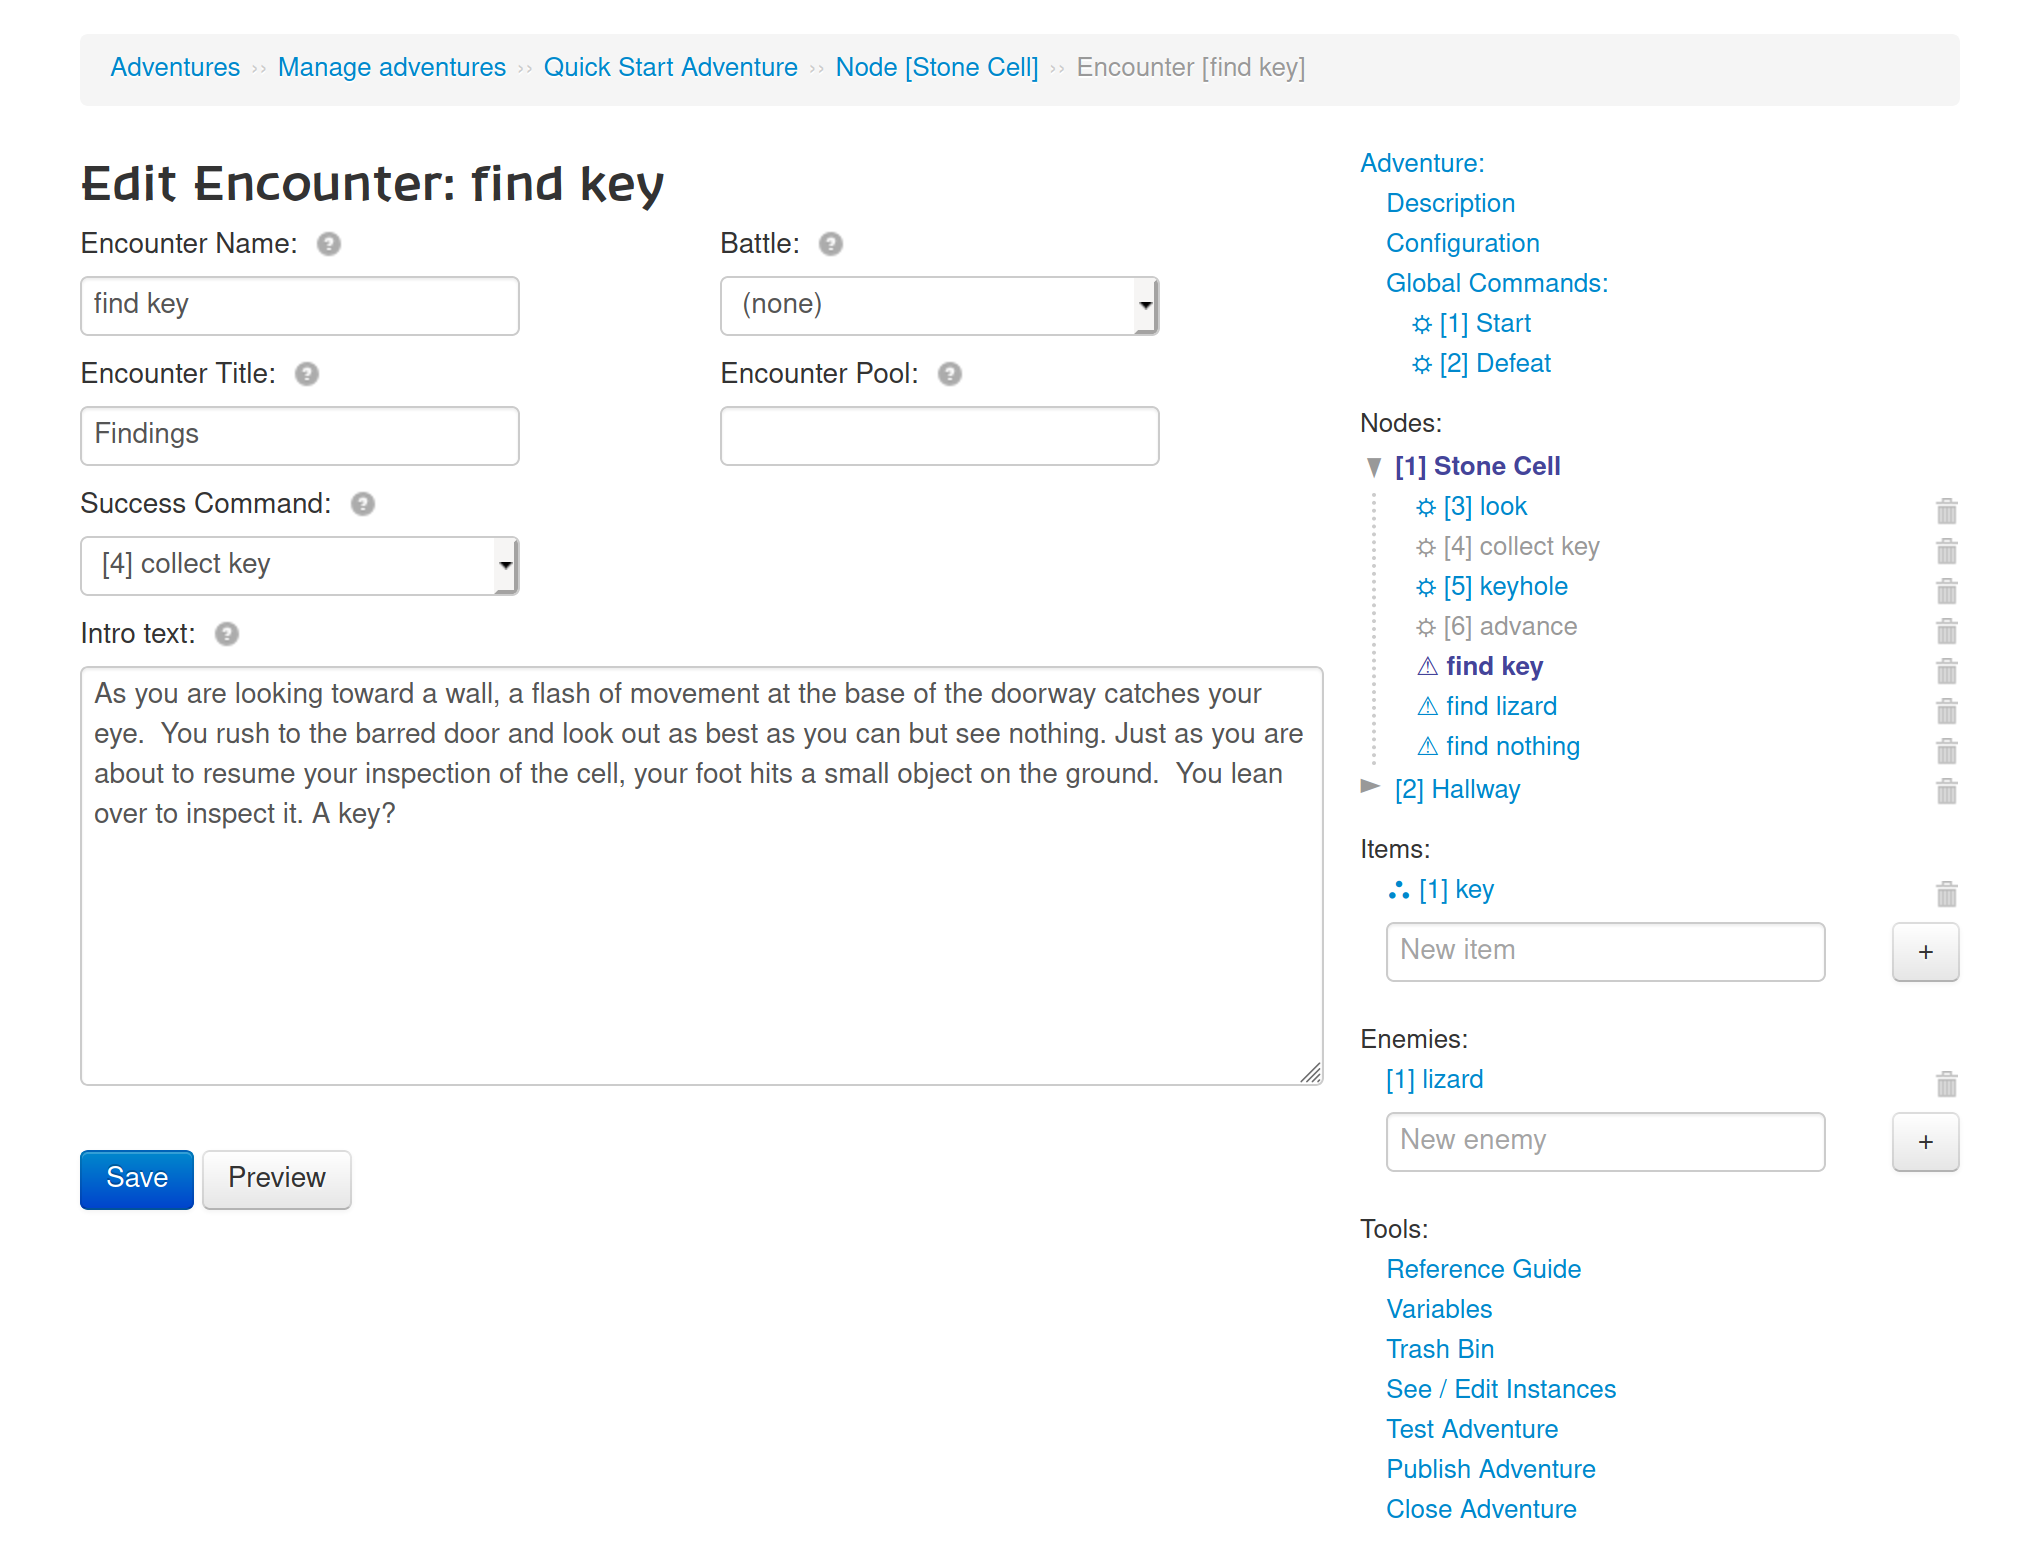
6.5: the “find key” encounter
There are three kinds of encounters: traditional encounters, battle encounters, and self-resolving encounters. All encounters begin with an introductory post. In a traditional encounter, each Adventurer must select an encounter-command to resolve it. In a battle encounter, an enemy must then be defeated. In this case, we’re creating a self-resolving encounter, which is like a traditional encounter except it resolves itself immediately. We do this by simply not creating any encounter commands in the encounter.
This encounter has one additional responsibility: it will run the (masked) command which gives the Adventurer the key item.
Instructions
- In the sidebar to the right, click on “⚠ find key”
- Under ‘Encounter Title’, fill in
Findings - Under ‘Success Command’, select
[4] collect key - Under ‘Intro text’, paste the following:
As you are looking toward a wall, a flash of movement at the base of the doorway catches your eye. You rush to the barred door and look out as best as you can but see nothing. Just as you are about to resume your inspection of the cell, your foot hits a small object on the ground. You lean over to inspect it. A key?
- Click ‘Save’
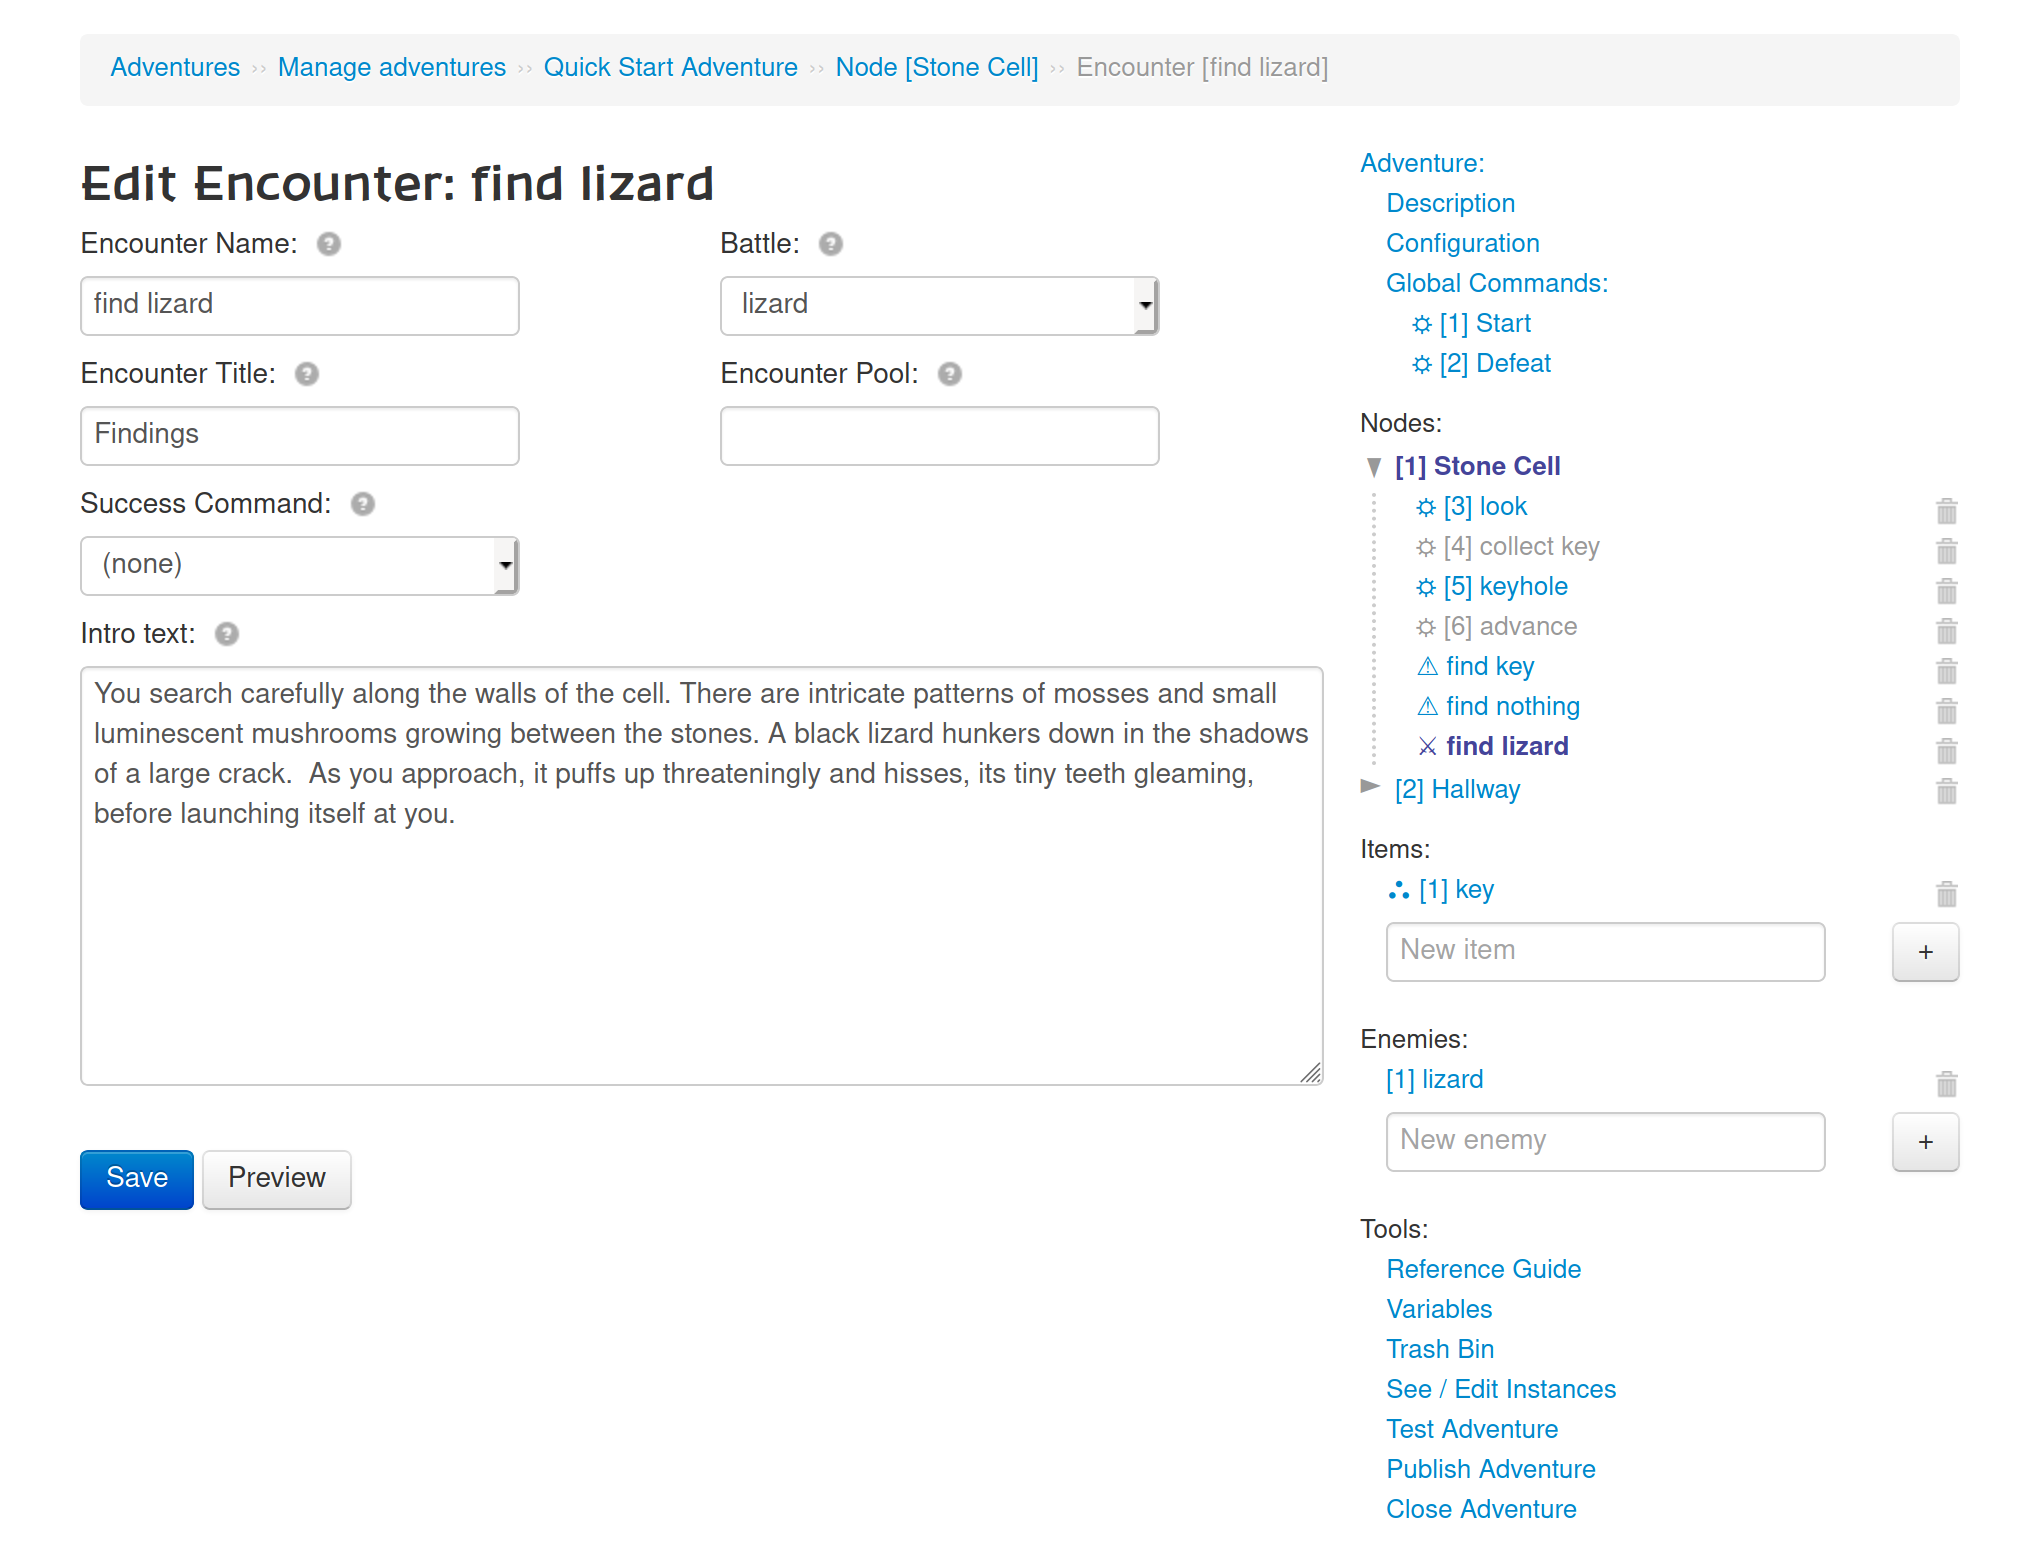
6.6: the “find lizard” encounter
This encounter is a battle encounter. We designate an enemy, and Adventurers must either defeat or all successfully free from the enemy. Unlike the “find key” encounter, we don’t need to run any commands when this encounter is resolved.
After you save this encounter, notice how the icon changes from “⚠” to “⚔” indicating that it is a battle encounter. Notice how it also jumps to the bottom of the encounter list: battle encounters are listed separately from regular encounters.
Instructions
- In the sidebar to the right, click on “⚠ find lizard”
- Under ‘Encounter Title’, fill in
Findings - Under ‘Battle’, select
lizard - Under ‘Intro text’, paste the following:
You search carefully along the walls of the cell. There are intricate patterns of mosses and small luminescent mushrooms growing between the stones. A black lizard hunkers down in the shadows of a large crack. As you approach, it puffs up threateningly and hisses, its tiny teeth gleaming, before launching itself at you.
- Click ‘Save’
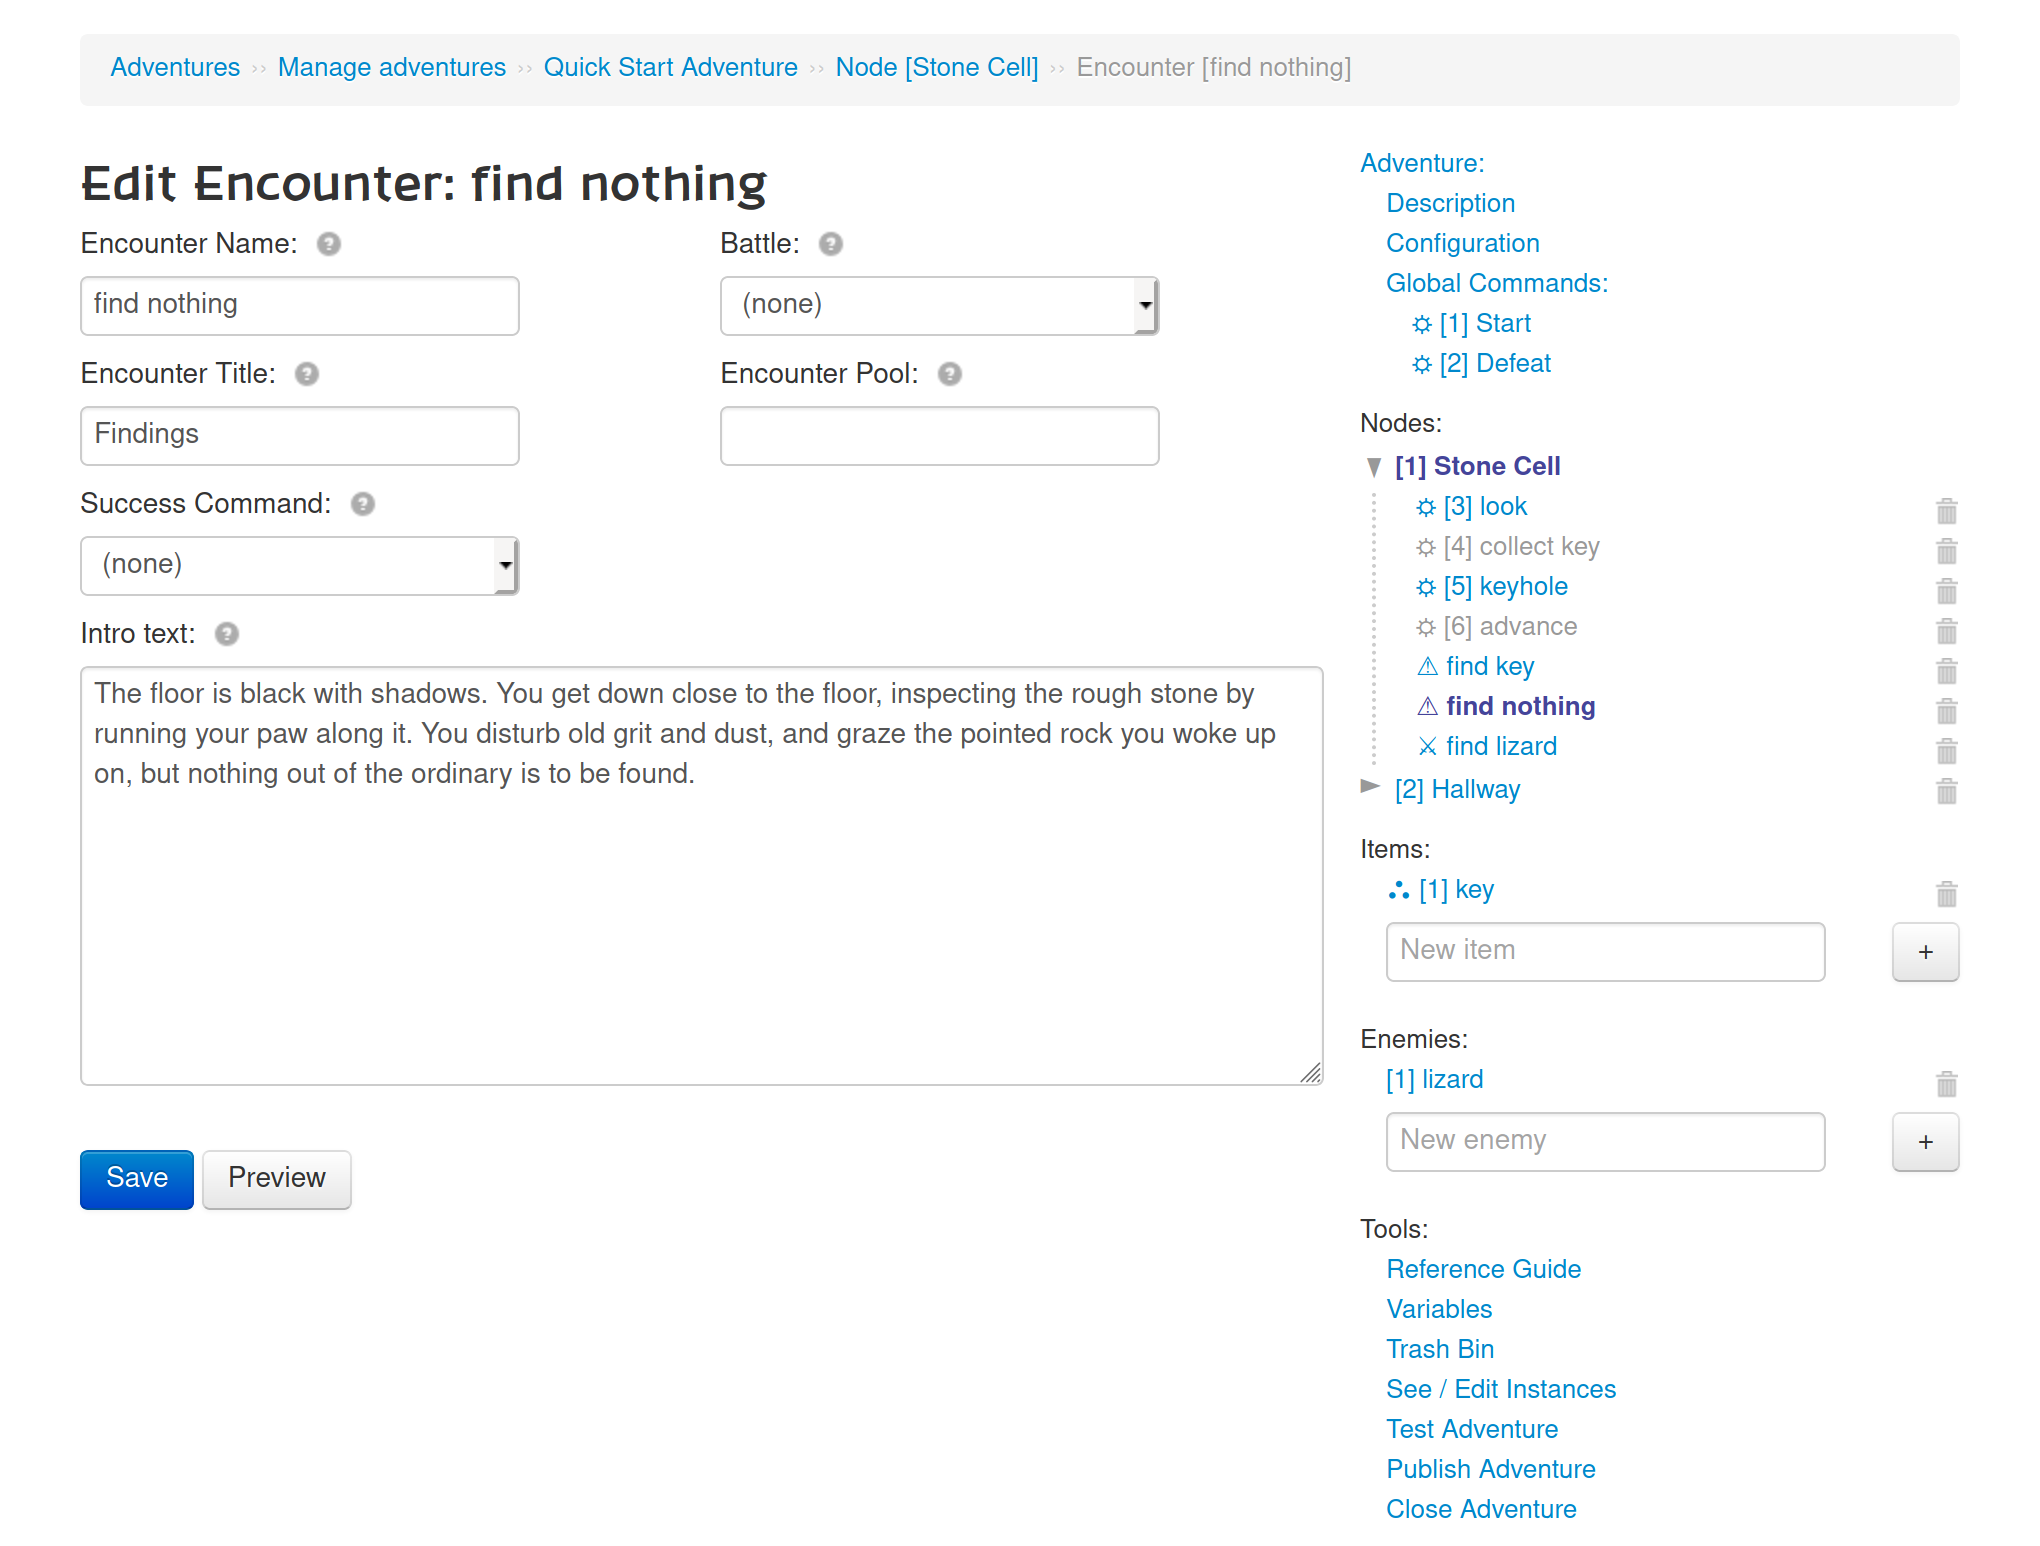
6.7: the “find nothing” encounter
This encounter will be almost identical to the “find key” encounter, except that we don’t end up getting a key. It is a self-resolving encounter, and so basically all it does is make a forum post. Recall that the reason that this is an encounter at all is so that we can use the encounter mechanics to take care of randomly selecting the outcome of the “look” command, and ensure that we don’t get the same outcome more than once.
Instructions
- In the sidebar to the right, click on “⚠ find nothing”
- Under ‘Encounter Title’, fill in
Findings - Under ‘Intro text’, paste the following:
The floor is black with shadows. You get down close to the floor, inspecting the rough stone by running your paw along it. You disturb old grit and dust, and graze the pointed rock you woke up on, but nothing out of the ordinary is to be found.
- Click ‘Save’
Whew! Hopefully you’re still with us. But you just finished the entire first stage of the adventure. Nice job!
When you’re ready, head on over to Step 7: Hallway.